
Basic positioning work — moving equipment into place, leveling a basin — can be handled by a contractor or kitchen fitter. But the actual plumbing connections, backflow prevention, and code sign-off need a licensed commercial plumber working alongside your kitchen designer. Skip that step, and you risk cross-contamination between handwash, prep, and warewash functions, slow leaks that damage flooring, or a voided manufacturer warranty.
This guide walks through the full setup process for bakery sinks — handwash, prep, three-compartment, and utility — following NSF and food-code standards from start to finish.
Key Takeaways
- Bakery sink installs need coordinated plumbing, drainage, and health code compliance from day one
- Confirm floor slope, hot water capacity, and local sink requirements before construction starts
- Installation follows four phases: site prep, positioning, plumbing integration, and functional testing
- Wash water must hit at least 110°F, with sanitizing rinse temperatures set higher per local code
- Most failures stem from hot water shortfalls, slow drainage, or sink placement that breaks health codes
Installation Guide for Bakery Sinks
Setting up a bakery sink station breaks down into four phases: preparing the plumbing and site, positioning and securing the sink, integrating water and drain systems, and validating everything before use.
A single handwash sink can typically go in within a few hours if a licensed plumber is on-site and the stub-outs are already in place. A full sink bank (handwash, three-compartment, and utility) is a bigger lift. Expect 1 to 3 days, plus coordination with electricians and, eventually, a health inspector.
Prerequisites and Safety Considerations
Before anyone touches a wrench, confirm the site is actually ready:
- Floor slope drains toward the correct point, and hot/cold lines are stubbed exactly where the sink will sit
- Drain lines are vented and sized correctly for the specific sink type going in
- Mounting style (wall-hung, leg-mounted, or undermount) matches available wall studs, floor space, and existing stub-outs
Accessibility matters too. Under the ADA Standards for accessible sinks, at least one sink of each type in an accessible space needs a 30-by-48-inch clear floor space, a rim no higher than 34 inches, and knee clearance of at least 27 inches.
Mop sinks and employee-only work sinks are exempt from this scoping rule.
Also confirm:
- A backflow prevention device sits on the water supply (often a properly sized air gap, not necessarily a mechanical valve)
- Sink placement doesn't block required aisle widths or egress paths
- The sink model is NSF-certified before you buy it, not after it's installed
Don't proceed if hot water can't reach required wash and sanitize temperatures, if a warewashing sink's grease trap isn't installed yet, or if your health department hasn't signed off on the plumbing plan.
Tools and Parts Required
Essential tools:
- Pipe wrench and basin wrench
- Plumber's tape and level
- Drill
- Food-safe silicone sealant for wall and floor seams
Essential parts:
- Faucet (gooseneck or wrist-blade for handwash sinks)
- Drain assembly with strainer and P-trap
- Flexible supply lines
- Mounting legs or wall brackets
One thing that trips up a lot of installers: mismatched hardware. Griffin Products' NSF-approved compartment and handwash sinks ship with specification-grade hardware already included (a swing-spout faucet, basket drains, and a faucet install kit sized to that model). That means one less parts list to reconcile against a separate faucet order.
Optional vs. essential: backsplashes, soap and towel dispensers, and drainboards make daily operations smoother but aren't required for a code-compliant install. Drains, traps, and faucets are non-negotiable.
How to Install Bakery Sinks (Step-by-Step)
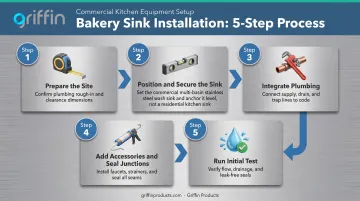
Installation follows a defined order. Skip a step, such as testing water temperature before the walls are finished, and you'll likely be doing rework later.
- Prepare the site — Mark stub-out locations, confirm floor slope and drain placement, and protect finished flooring before moving equipment in.
- Position and secure the sink — Mount legs or wall brackets, level the basin, and anchor it per the manufacturer's specs. A full three-compartment sink loaded with water is heavy; secure anchoring matters.
- Integrate plumbing — Connect hot and cold supply lines, install the faucet, connect the drain and P-trap, and tie warewashing sinks into the grease trap line.
- Add accessories and finish integration — Install soap and towel dispensers on handwash sinks or drainboards on multi-compartment sinks, then seal every wall and floor junction.
- Run an initial test — Send hot and cold water through every compartment to confirm flow, temperature, and drainage before calling it done.
Post-Installation Checks and Validation
Once the sink is in, validation confirms it works under real conditions, not only that it looks installed.
Visual checks: Is it level? Securely mounted? Free of gaps at wall or floor seams?
Functional testing: Run water through every fixture, check underneath for leaks, and confirm drainage flow rate meets expectations.
Temperature validation: This step catches problems other checks miss. The FDA Food Code sets manual wash water at a minimum of 110°F, with hot-water sanitizing rinses at least 171°F held for 30 seconds.
Chemical sanitizer temperatures vary by product. Chlorine, iodine, and quaternary ammonium solutions each have their own minimum thresholds.
Skipping validation only pushes failures downstream. Undetected leaks cause water damage weeks later. Temperature shortfalls usually surface during the formal health inspection, the worst moment to find them.
Common Installation Problems and Fixes
These problems show up most often during install or right after the sink goes into daily use. Catching them early avoids failed inspections and costly callbacks.
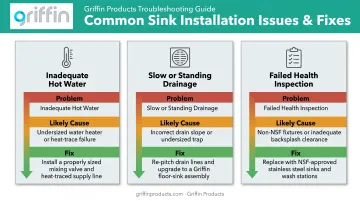
Issue 1: Inadequate Hot Water Temperature
Problem: Sink water never reaches the minimum wash or sanitize temperature required by code.
Likely cause: An undersized water heater, or one located too far from the sink bank, losing heat along the line.
Fix: Install a point-of-use booster heater near the sink, or upsize the building's water heater capacity.
Issue 2: Slow or Standing Drainage
Problem: Water pools in the basin instead of draining freely.
Likely cause: An improperly vented P-trap, an undersized drain line, or a grease trap left uncleared before final connection.
Fix:
- Verify the vent stack is functioning
- Confirm drain line sizing against local code
- Set a recurring grease trap cleaning schedule
Under the International Plumbing Code, pot sinks and pre-rinse sinks must feed into a grease interceptor sized to an accepted standard. That requirement is not optional for warewashing sinks.
Issue 3: Failed Health Inspection
Problem: The inspector flags handwash sink location, a missing backflow preventer, or inadequate clearance.
Likely cause: The sink was placed based on available floor space rather than local health code requirements.
Fix: Review the plumbing plan with the local health department before rough-in, and retrofit a backflow device if one's missing.
Pro Tips for Installing Bakery Sinks Effectively
A few habits separate a smooth install from a stressful one:
- Install sinks after rough plumbing is done but before final flooring, so heavy equipment never rolls over finished surfaces
- Keep stainless steel wrapped in protective film until final cleaning; nearby construction scratches exposed steel fast
- Have NSF certs and spec sheets ready for the inspector, and get plumber and inspector walkthrough sign-off before opening
- Pull CAD DWG, PDF specs, and Revit RFA files from Griffin Products ahead of time so inspection paperwork isn't a scramble
- Use a licensed commercial plumber for multi-compartment sinks on a grease trap or dedicated gas water heater who knows local food-service code
- Skip force-fitting standard units into tight or odd layouts—submit a description or drawing to Griffin Products for a special-order sink built to fit
Conclusion
Installation quality shapes hygiene compliance, how smoothly your team moves through daily prep, and how long the sink lasts before something needs repair. A rushed install often means a redone install.
Plan your prerequisites carefully, follow the installation sequence in order, and validate every connection and temperature before your bakery opens for production. It's far less expensive to catch a problem during testing than during a health inspection.
Frequently Asked Questions
How should bakery sinks be set up?
Bakery sinks should be zoned by function (handwash, warewash, prep/utility) and positioned to follow your ingredient-to-finished-product workflow. Installation must meet local health code requirements for drainage, hot water, and clearance.
What type of sink is required in a commercial bakery?
Most jurisdictions require a three-compartment sink for manual warewashing plus a dedicated handwash sink. A separate utility or mop sink is often required as well.
How many sinks does a bakery need?
At minimum, expect a handwash sink plus a warewashing sink. Larger operations typically add prep or utility sinks depending on production volume and local code requirements.
Can a bakery use a two-compartment sink instead of a three-compartment sink?
Most health codes require three compartments for manual wash-rinse-sanitize. A two-compartment setup may be approved only if a commercial dishwasher handles the sanitizing step, and even then, approval is site-specific.
Do bakery sinks need NSF certification?
Yes. Most health departments require or strongly prefer NSF-certified sinks because those standards already align with food service health and safety rules.
How much does it cost to install a commercial bakery sink?
Cost varies widely based on sink type, plumbing complexity, and whether new water or drain lines are needed. Budget for both the sink and licensed plumbing labor, then get a site-specific quote.